Grid Trading EA 20.4
Robô de Negociação para Metatrader (MT4/MT5)
-
ℹ Visão global
A negociação em grade é uma estratégia de negociação mecânica eficiente que não depende de direção, lucra com a volatilidade e usa a natureza ondulante intrínseca do mercado. Ele usa níveis de preços fixos para entrar e sair das negociações em uma ou ambas as direções. Essas negociações, geralmente espaçadas em intervalos de 20-200 pip, criam uma grade de negociação. A negociação em grade tem várias vantagens:
- Fácil de configurar e supervisionar
- É independente do período de tempo
- Não são necessários indicadores ou análises rígidas
- Negocia faixas de preços, não configurações de negociação
- Requer pouca previsão do mercado
- Extrai dinheiro do mercado regularmente
Este EA possui um conjunto de recursos exclusivos:
- Ele pode negociar longo, curto ou bidirecional
- Ele pode negociar muitos símbolos simultâneos
- As grades podem ser fechadas ou pausadas a critério do comerciante
- Implementa metas de lucro direcionais e bidirecionais
- Não comercializa grades abertas, a exposição é limitada
- A configuração da grade pode ser alterada em tempo real
- O risco e a exposição são pré-calculados e exibidos
- Implementa três comportamentos diferentes
- Funciona para forex, CFDs e futuros
Este é indiscutivelmente o EA de negociação em grade mais flexível que você encontrará e pode ser usado em uma miríade de maneiras diferentes.
Como começar
- Carregue o EA em qualquer gráfico e período de tempo
- Escolha uma direção de negociação (compra, venda ou bidirecional)
- Edite o espaçamento e a quantidade de negociações até que o risco seja aceitável
- Comece a grade
Como obter melhores resultados
A lucratividade alcançada depende da sua capacidade de definir limites de preços sensatos. Encontre faixas de preços razoáveis para negociar e inclua-as no EA como âncora e limite de preços. Essa prática concentra a atividade de negociação dentro de faixas de preços lucrativas. Por exemplo, em EURUSD você pode querer definir um limite de preço de compra de 1,35 e um limite de preço de venda de 1,25. Use gráficos semanais e mensais para encontrar esses intervalos.
Dicas de uso
- Se o mercado for barato, negocie apenas por muito tempo
- Se o preço do mercado estiver superfaturado, negocie a descoberto apenas
- Não se sinta obrigado a fazer negociações bidirecionais
- Não carregue o EA duas vezes no mesmo símbolo
- Evite negociar em uma direção com grandes custos de troca
- Negocie de um VPS ou deixe seu computador de negociação ligado 24/5
- Não descarregue o EA para garantir a atomicidade do processo
- Não há necessidade de alterar o número mágico de símbolo para símbolo
- Use a fase (multiplicador de cash-in) de cada grade para compensar o ponto flutuante
- Defina um limite de preço para cada grade de insumos, isso aumentará drasticamente seus lucros
- Use as metas de lucro para redefinir a grade regularmente e evitar acumular muitas negociações
Informações técnicas
- O EA avalia no fechamento da barra M1
- As negociações não têm ordens de stop-loss ou take-profit
- A EA usa ordens de mercado, o spread não é um problema
- O EA não negociará ao vivo se houver risco de uma chamada de margem com as configurações atuais
- No entanto, o EA trocará o testador com quaisquer configurações, independentemente do risco
- A EA negocia um tamanho de lote manual: o testador não refletirá os lucros compostos
- Os custos de troca são exibidos no canto inferior direito do gráfico
- Quando todas as negociações são colocadas, a negociação mais antiga é fechada com perda e o EA continua negociando
- ≡
Parâmetros
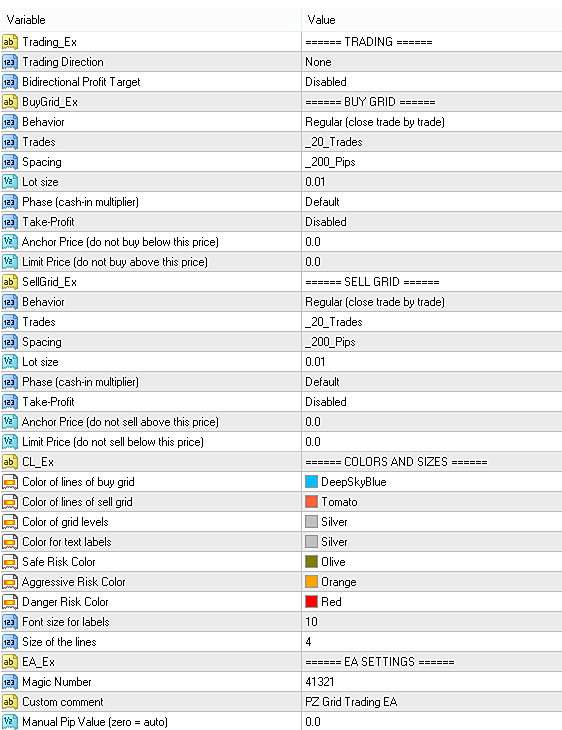
Ao carregar o gráfico expert, você terá à sua disposição uma infinidade de parâmetros de entrada, agrupados em blocos de fácil compreensão.
- Trading Direction
- It can be long, short or bidirectional.
- Bidirectional Profit Target
- When you are running a long and a short grid simultaneously, you can define a combined profit target. For example, one spacing unit. When the combined profits of both grids reaches your target, both grids are closed securing the profit, to later start trading again fresh.
- Grid Behavior
- This parameter controls how the grid operates and what it does when all the trades of the grid are allocated. In live trading, you would be changing the behavior of the grid according to what the market is doing and what you want to do with the grid -expand it or liquidate it-.
- Regular: The grid operates normally, adding and closing trades.
- Paused: The grid sits idle. Trades are not placed, nor closed.
- Averaging: Tries to exit the grid at the average price of all trades.
- Trades
- This is the amount of trades in the grid.
- Spacing
- The spacing, also known as the gap, is the distance between the trades of the grid, and it is also the profit target for each individual trade. For live trading, a spacing between 80 pips and 200 pips can be considered safe.
- Lotsize
- This is the lot size for each trade of the grid.
- Phase
- The phase is the cash-in multiplier: a higher phase increases the profit target for each individual trade of the grid. For example, if we have a phase of 3 on a grid of 100 pips spacing, the profit target for each individual trade will be 300 pips.
- Take Profit
- The take profit for the grid is optional. A take-profit will cause the grid to reset, closing all trades and starting fresh, when a certain profit has been realized. This prevents the grid from over expanding. It is expressed in spacing units. For example, if the grid spacing is 100 pips and the Take-Profit is 10 spacing units, the grid will reset and start fresh when it has won 1,000 pips. This option is very useful if the symbol has high swap costs or if we are afraid of a trend going outside of the range of our grid.
- Limit Price
- This is the price limit for the grid: the grid will not continue trading beyond this price. This parameter enables us to configure grids that are only triggered if the market is inside a certain price range. For example, you can set up a buy grid on GOLD and instruct the grid to buy only if the price is below 1400$/oz. To do that, you would just enter 1400 in the Buy Limit Price parameters. The same applies for short but on the opposite side.
- Anchor Price
- Similar to the above parameter, the Grid Anchor is a price limit of the grid but on the negative side. This parameter enables us to limit the grid trading activity to a predefined trading range. For example, you might want to create a long grid on EURUSD from 1.0000 to 1.16250 and let the EA calculate the spacing for you. The EA won't trade EURUSD below 1.0000 or above 1.16250.
- Colors and sizes
- This parameter block sets the color and sizes for labels and lines.
- EA Settings
- If you know what you are doing, you can change the Magic Number of the EA, the comment for the trades and override the value of one pip, which can be useful if you are trading CFDs.
- ?
FAQ
- Should I use this Expert Advisor if I ignore what grids are?
- No, you should not. Grid Trading is for amateur traders and beyond.
- Is grid trading a martingale?
- No, it is not. There is no intrinsic difference between a trade of 0,20 lots and 20 concurrent trades of 0,01 lots. A strategy is a martingale inasmuch it deals with independent events with fixed probability of occurrence and payoff. Grids, however, use a constant lotsize per trade.
- I have heard that grid trading is dangerous. Is it?
- Yes, it is: just like any other powerful tool. Poorly managed or allocated grids can decimate your trading account. However, if properly used, grid trading is not only safe but very profitable because it provides almost unlimited adaptability to what the market is doing. The key is not using too much leverage.
- Is grid trading NFA FIFO compliant?
- No, it is not.
- Can I set the stop
- loss for each trade or for the grid?
- No, you can't. Make sure to configure the grid properly: the total grid exposure must never be above three times your account equity and the grid range has to be wide enough to reach a strong support or resistance. You can, however, stop all trading activity manually on certain drawdown levels.